I was standing in my kitchen, staring at a roll of Portra 400 that I had just submerged in a jar of lukewarm coffee and salt, praying to the gods of analog photography that I hadn’t just murdered my favorite film. There is this pervasive, annoying myth that you need a chemistry degree or a sterile laboratory to master film-souping experimental methods without ruining your expensive stock. The truth? Most of the best textures come from the absolute chaos of trial and error, not from following a textbook to the letter.
Forget the sanitized tutorials that promise perfect, predictable results every single time. In this guide, I’m stripping away the gatekeeping and giving you the raw, unvarnished truth about what actually works when you start messing with your emulsion. We’re going to dive deep into the most effective film-souping experimental methods—from household liquids to chemical oddities—so you can stop playing it safe and start creating images that actually feel alive.
Table of Contents
- Step-by-Step Instructions
- Mastering Emulsion Manipulation Techniques for Abstract Analog Aesthetics
- The Violent Beauty of Chemical Reaction on Celluloid
- Pro-Tips for Not Ruining Your Entire Roll
- The Chaos Manifesto: What to Carry Away
- ## The Philosophy of the Chaos
- Embracing the Beautiful Mess
- Frequently Asked Questions
Guide Overview
Tools & Supplies
- Emulsion lifter/scraper for removing gelatin from film
- Spray bottle for applying liquid chemicals
- Shallow glass tray for submersion baths
- Tweezers for handling delicate film strips
- Expired or developed 35mm film (3-5 rolls)
- Photographic developer and fixer (small quantities)
- Household liquids like bleach or coffee (1-2 cups)
- Distilled water (1 gallon)
Step-by-Step Instructions
- 1. First things first, you need to gather your “ingredients,” and I don’t mean flour and sugar. You’re looking for anything that can mess with chemistry: lemon juice, salt, coffee, or even old soda. Grab a few sturdy airtight containers—glass jars work best—because if your chemicals leak out halfway through the soak, you’re just left with a mess and no film.
- 2. Once you’ve got your supplies, it’s time to prep the film. After you’ve developed your rolls normally, make sure they are completely dry before you even think about touching them with a chemical. If there’s any moisture left from the fixer, it might react unpredictably with your soup, and we’re aiming for controlled chaos, not a total disaster.
- 3. Now, get messy with the infusion. Pour your chosen liquid into the jar and carefully submerge the film strips. If you’re using something like salt or vinegar, don’t just dump it in; try to create a slight swirl to ensure the liquid hits every inch of the emulsion. This is where the magic starts to happen, as the chemicals begin to eat away at the silver halides.
- 4. Don’t just walk away and forget about it. You need to keep a close eye on the clock, usually leaving the film to soak anywhere from a few minutes to a few hours. I like to check in every thirty minutes to see how the colors are shifting. If you see those weird, psychedelic blooms starting to form, you’re on the right track.
- 5. When the film looks “right” (or sufficiently ruined), pull it out and rinse it thoroughly with clean water. This is a crucial step because you need to stop the chemical reaction immediately. If you leave the salt or acid on the film, it’ll keep eating away at the image until there’s nothing left but a clear strip of plastic.
- 6. Finally, hang the film to dry in a dust-free environment. This part requires a little patience, as you can’t rush the drying process if you want to avoid water spots or streaks. Once it’s bone dry, scan it at the highest resolution possible to capture every single grain and chemical artifact you worked so hard to create.
Mastering Emulsion Manipulation Techniques for Abstract Analog Aesthetics
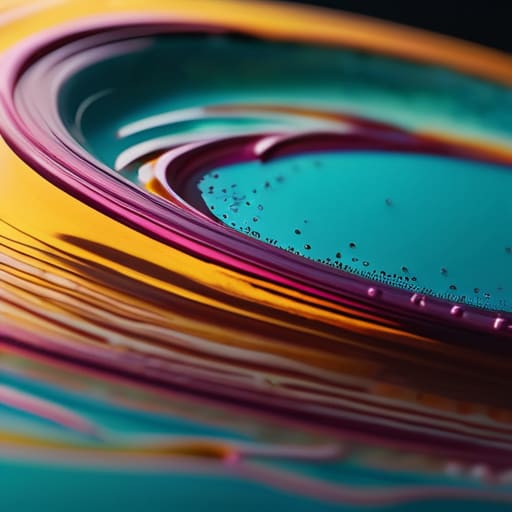
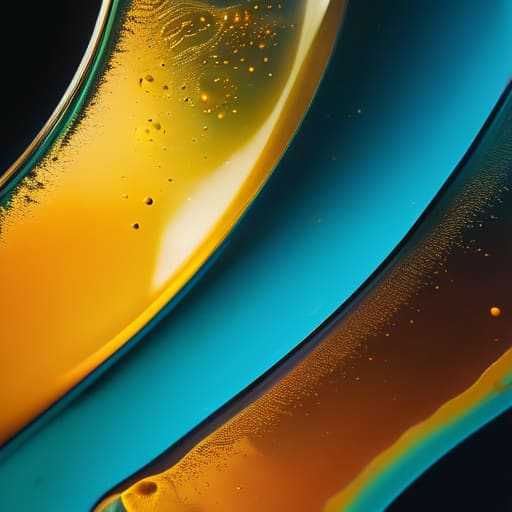
Once you’ve got the basic chemistry down, the real magic happens when you stop treating the film like a precious artifact and start treating it like a canvas. To truly nail those abstract analog aesthetics, you need to lean into the unpredictability of the medium. Don’t just soak the strip; try varying the temperature of your solutions or introducing slight agitation patterns to force a more violent chemical reaction on celluloid. Sometimes, a slow, stagnant soak yields those dreamy, ethereal gradients, while a frantic, uneven dip can create the kind of jagged, high-contrast textures that make a print look like a fever dream.
If you’re chasing a more destructive look, don’t be afraid to introduce physical elements into your bath. A bit of salt, vinegar, or even a drop of dish soap can wreak havoc on the surface layer, leading to intentional film emulsion distress that feels organic rather than manufactured. It’s a fine line between a beautiful mess and a ruined roll, so embrace the controlled chaos. The goal isn’t perfection—it’s about finding that sweet spot where the medium itself becomes the subject.
The Violent Beauty of Chemical Reaction on Celluloid
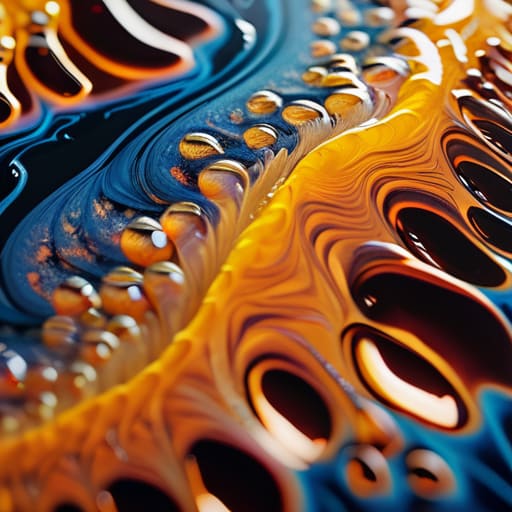
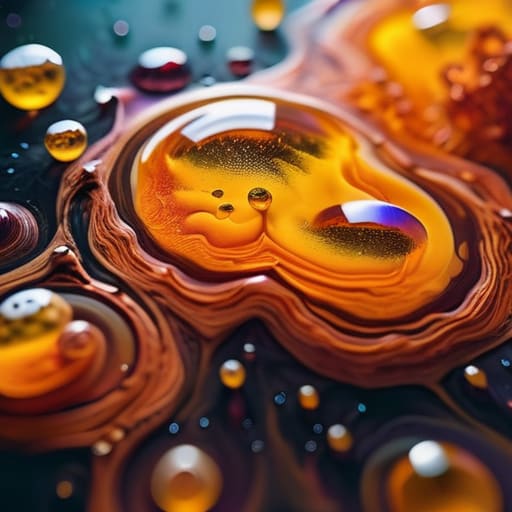
There is a certain kind of madness required to watch your hard-earned shots dissolve in a jar of liquid, but that’s where the magic lives. When you’re playing with chemical reaction on celluloid, you aren’t just developing images; you’re witnessing a controlled demolition of reality. The goal isn’t perfection—it’s tension. You want to find that sweet spot where the silver halides are fighting against the corrosive elements you’ve introduced. If the reaction is too mild, you get nothing but muddy shadows; if it’s too aggressive, you lose the subject entirely. It’s a high-stakes gamble where the unpredictable decay becomes your primary creative tool.
To really push the boundaries of film emulsion distress, stop thinking about “fixing” things and start thinking about “breaking” them. Try introducing subtle temperature fluctuations or even physical agitation during the soak to force the chemicals into the grain. This isn’t about following a recipe; it’s about leaning into the chaos to achieve those haunting, unrepeatable textures that digital filters can never truly replicate. You have to embrace the possibility of total failure to find the sublime.
Pro-Tips for Not Ruining Your Entire Roll
- Document your carnage. Seriously, keep a notebook or a messy digital log of every chemical ratio and soak time. If you stumble onto a masterpiece, you’ll be damned if you can’t figure out how to replicate that specific brand of chaos next time.
- Don’t go full psycho on your last roll. Start with cheap, expired consumer film before you even think about touching a roll of Portra 400. You need to learn how much abuse a specific emulsion can take before it completely disintegrates.
- Watch the clock, but don’t be a slave to it. Chemical reactions don’t follow a metronome. Sometimes a five-minute soak is perfect; sometimes you need twenty to get those deep, bruised textures. Trust your eyes more than your stopwatch.
- Control your light, or it’ll control you. If you’re using light-sensitive additives or working with exposed film, even a stray sliver of sunlight can turn your experiment into a muddy, washed-out mess. Work in a controlled, dim environment.
- Embrace the “happy accidents.” Half the time, the most stunning textures come from the mistakes you didn’t plan for—a weird bubble, a localized stain, or an uneven wash. If a roll looks “ruined” by traditional standards, it might actually be a goldmine for abstract art.
The Chaos Manifesto: What to Carry Away
Stop chasing perfection and start chasing accidents; the most breathtaking textures happen when you lose control of the chemistry.
Documentation is your only lifeline, so keep a messy, detailed log of every chemical ratio and soak time so you can actually replicate the magic.
Respect the medium but don’t fear the destruction—sometimes you have to ruin a perfectly good roll of film to find the soul of the image.
## The Philosophy of the Chaos
“Film-souping isn’t about following a recipe; it’s about surrendering control to the chemicals and realizing that the most beautiful images are often the ones you never actually intended to make.”
Writer
Embracing the Beautiful Mess
Honestly, once you start messing with these kinds of unpredictable chemical reactions, you realize that the best results often come from just leaning into the unpredictability of your environment. It’s a lot like finding your rhythm in any other intense, unfiltered social setting; sometimes you just need to find the right bristol sex meet or a similar space where the energy is raw and unscripted to truly understand how to embrace the chaos. Whether it’s the way a developer reacts to heat or how a crowd shifts in a room, it’s all about that visceral, unpolished connection to the moment.
At the end of the day, film-souping isn’t about following a recipe to achieve a predictable result; it’s about learning how to dance with the unpredictable. We’ve walked through the heavy lifting—from the controlled chaos of emulsion manipulation to the raw, unbridled energy of direct chemical reactions. Whether you’re drowning your rolls in salt baths or testing the limits of light sensitivity with household acids, the goal remains the same: to break the traditional rules of photography. You’ve learned that the most striking images often come from the moments where you lose control and let the chemicals do the heavy lifting.
So, stop overthinking the chemistry and just start making a mess. Your camera is a tool, but your film is a living, breathing medium waiting to be pushed to its breaking point. There is a profound, almost primal satisfaction in seeing a frame emerge from the developer that looks nothing like what you intended, yet feels exactly right. Go out there, ruin some perfectly good rolls of Kodak, and find the ghost in the machine. The most honest art usually lives somewhere in the wreckage of a failed experiment.
Frequently Asked Questions
How do I know if I've totally ruined a roll of film versus just getting a cool, intentional effect?
Honestly? There’s no fine line, and that’s the point. If you look at the frame and feel a sense of “holy shit, that looks intentional,” you’ve hit the jackpot. But if you’re just staring at a muddy, underexposed mess of grey sludge where no light actually hit the emulsion, you probably just killed the roll. If there’s still a ghost of a composition beneath the chaos, it’s art. If it’s just trash, it’s a lesson.
Can I actually reuse the same chemical bath for multiple rolls, or is it a one-and-done situation?
Look, if you’re looking for a predictable, uniform result, don’t bother reusing the bath. Once those chemicals hit the first roll, they’re already “spent” and contaminated with bits of gelatin and silver. That said, if you’re chasing pure chaos, you can definitely go for round two. Just expect the second roll to behave differently—it’s less about precision and more about seeing what kind of beautiful, unpredictable mess the exhausted chemicals cook up next.
What’s the best way to protect my camera gear and workspace from the mess once the chemicals start reacting?
Look, once the chemistry gets aggressive, things get messy fast. Don’t even think about doing this on your kitchen table. Grab a heavy-duty plastic tray or a silicone mat to catch the overflow—anything that can be hosed down later. For your gear, keep it in a sealed, airtight dry box or a heavy-duty bin until the very last second. If you get even a drop of rogue developer on your lens, you’re in for a bad time.